How To Measure Customer Effort With IBM Watson Assistant
Gauging Customer Effort In Your Chatbot Is Key In Decreasing Friction
Introduction
What is Customer Effort, and how can it be measured from chatbot conversations?
And, how can Disambiguation improve Customer Effort?
Aslo, can Automatic Learning be employed to improve Customer Effort over time?
Below you will find an explanation of what customer effort is.
And a complete how to guide on extracting Customer Effort from your IBM Watson Assistant chatbot.
What Is Customer Effort?
Customer effort is an extremely convenient metric to measure your chatbots performance.
A chatbot’s customer effort measurement boils down to the chatbot’s ease of use. You can see it as the effort exerted or expended by the user to achieve their objective.
Should the customer effort (friction) be too high, the user will revert to other mediums and in this instance the chatbot would have failed in its mission.

Here is a practical example of customer effort.
- If your customer chooses the third option in a list of choices, the effort expended is considered to be higher than the effort expended to choose the first option.
- Likewise, if a customer chooses None of the above, to signify that none of the options address a need, then the effort metric is even higher.
- For example, IBM Watson Assistant uses a notebook to plot the Customer Effort metric values graphically, so you have a visual indication of how the metric changes over time.
- You can also see related information such as disambiguation volume and which dialog nodes are most frequently included as disambiguation list options.

Customer effort can be calculated and displayed per node and over time. This helps you to identify which nodes are yielding negative NPS and where improvement is required.

Above you can see the customer effort for the Take Loan node or dialog is much lower than Pay node. Hence it is clear where the friction needs to be reduced.

The graph above shows the total (red line) and average (blue line) customer effort over time. The shaded area indicates the time auto learning was applied for. There is a considerable drop in customer effort during the time auto learning was applied.

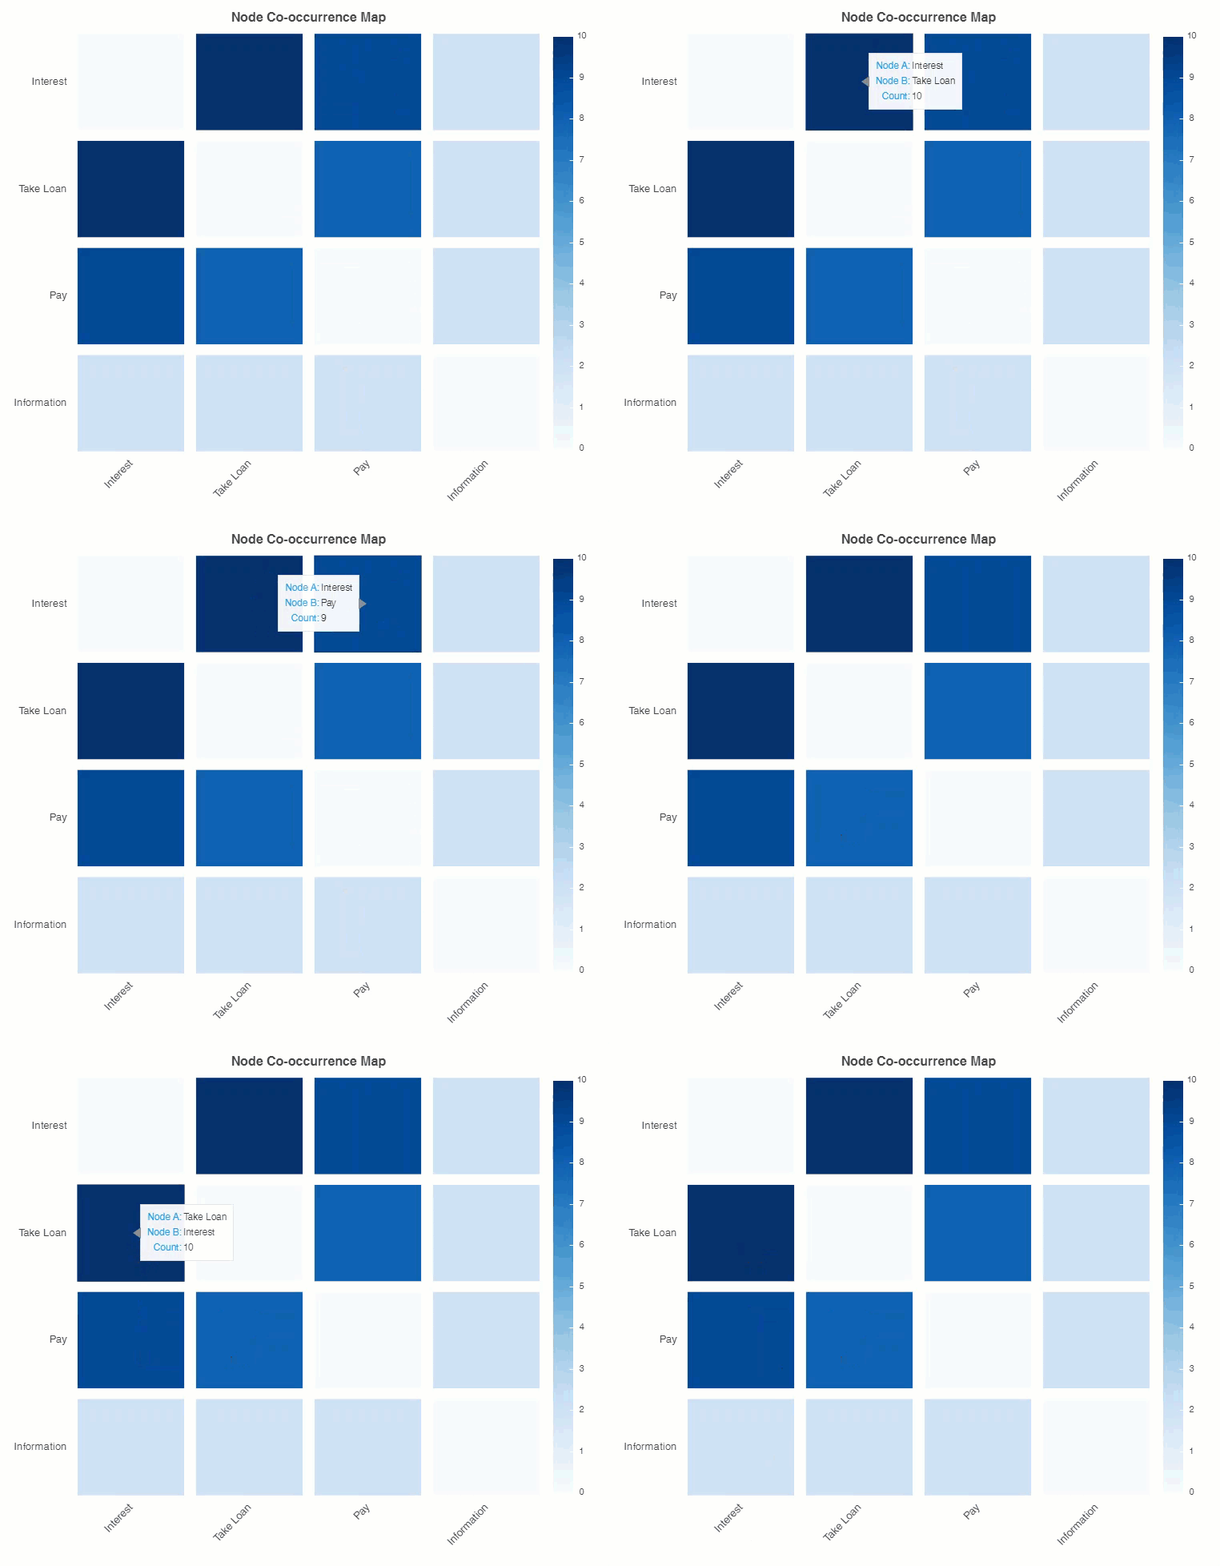
You can see users showing interest in a loan gets to the node of taking a loan. Showing interest and asking about payment is also co-occurring. Taking a loan and payment also goes together.
It is evident that payment is paramount in users interest.
How to Setup IBM Watson Assistant For Customer Effort Extraction?
After you have created your skill, you will have to link it to an assistant to bring all the components together.

Once you have created the skill, go to Options within the IBM Watson Assistant console. You need to activate Disambiguation. You can set the disambiguation message, the closing or last option and how many suggested option you want to present.

Subsequently, Autolearning needs to be activated. This is where you reference the Assistant and not the skill. But it is merely an administrative task to link the skill to an assistant.
Autolearning can be activating with one click.

Here is a look at the simple prototype skill I built to test customer effort. Firstly, there are four intents, all related to banking. I have made them very similar on purpose to force ambiguity and hence activating the disambiguation function.

Next a basic structure is defined for the dialog. Each of the intents have a dialog node assigned to it.

The next step is to engage with your bot and create some conversational data. I continually entered ambiguous utterances on purpose, to force the disambiguation menu. But I was very consistent in what option I selected to be associated with the utterance.

One example, I entered the utterance paying loan, kept selecting the Pay item in the menu. Eventually this item moved up in the list to the first option. So this is one example where I improved (artificially at that) the customer effort to get to the Pay menu.
But the idea was to create data we can work with.
Next you can open a Jupyter notebook in a browser…
The process of opening a notebook is straight-forward, opt for the Classic Notebook tile with the Python logo.

Then you can open this GitHub page on a separate tab to copy and paste the commands.
Once you have pasted a section of code, click on Run. Evert hing should run successfully. Do not run too large chunks of code…

The only difficulty you might have is connecting to your Assistant’s API settings. Follow the standard in the image below. Finding the apikey and other ID’s within the Watson Assistant Console is straightforward.

If you see the text below, you have successfully connected to your assistant.

Extracting disambiguation logs from 8 conversations code…
disambiguation_utterances = extract_disambiguation_utterances(df_formatted)And the result:

Clicks versus effort and the effect of auto learning….
show_click_vs_effort(disambiguation_utterances, interval='5-minute')And the result:

Nodes yielding the highest customer effort…
show_top_node_effort(disambiguation_utterances, top=10, assistant_nodes=assistant_nodes)And the result:

Customer effort per dialog node over time…
show_node_effort(disambiguation_utterances, assistant_nodes, interval='5-minute')And the result:

Select an utterance for Customer Effort…
show_input_effort(disambiguation_utterances, top=20, interval='5-minute')And the result:

Conversational dialog nodes heat map…
# Select nodes appearing in the top co-occurred node pair
TOP_N_NODE_PAIR = 30
selected_nodes = pd.unique(top_confused_pairs.head(TOP_N_NODE_PAIR)[['Node A', 'Node B']].values.ravel())
selected_matrix = cooccurrence_matrix[selected_nodes].loc[selected_nodes]# Select all nodes
# selected_matrix = cooccurrence_matrixshow_cooccured_heatmap(selected_matrix)
And the result:

Conclusion
There are more commands you can experiment with, and you can also create your own or edit the existing.
Combining these three elements:
- Disambiguation
- Automatic Learning
- Customer Effort
makes for a measured and user focused continuous improvement of the user experience.
